As you’ve probably noticed by now, I’m a bit of a traditionalist. All my food snobbery can’t change my love for the roast beef and gravy recipe of my childhood that involves all canned and processed ingredients. So, when I first found Heidi Swanson’s recipe for Mesquite Chocolate Chip Cookies, I was intrigued, but not convinced. I was intrigued enough to order some mesquite flour from Amazon (I love Amazon, but the shipping price was a little crazy). Sadly for me (and for everyone else out there in cyberspace), when my flour arrived and I went online to get her recipe, I found it was gone. She’d taken it down because she included it in her book Super Natural Cooking. I own this book, but I’d lent it to a friend. So, I had to wait.
In the meantime, I couldn’t help myself, I just had to open the mesquite flour to see what all the fuss was about. From the moment you open that bag, the aroma is amazing – it’s warm, nutty, spicy, kind of cinnamon-y and kind of cocoa-y. I’m considering using it as perfume. Seriously.
When I finally got my book back (I shouldn’t say finally, it didn’t take that long…but it seemed like a long time with mesquite flour and organic chocolate chips sitting on my counter, staring at me), I couldn’t wait to make these cookies. I made mine almost exactly like Heidi’s recipe. The only differences were I used coconut oil, as part of a new experiment, and regular old (evil) white granulated sugar because I didn’t have the good stuff Heidi’s recipe calls for and I was too lazy (and too anxious to get started on these cookies) to run out to the health food store to get some.
So, the cookies…this recipe comes together just like a regular chocolate chip cookie dough. It doesn’t have a ton of ingredients, so I think it’s important to use high quality ones whenever possible. (Thanks to Tera for bringing this to my attention in the early days of my food snob awakening…it was Tera who practically wrestled a bottle of imitation vanilla from my hand on our first Christmas cookie baking day…I’ve never let her live down her food snobbery, but I’ve also never bought imitation vanilla again). So, I use organic, free range eggs, organic butter (when I use it), real, high-quality vanilla, and a good brand of whole wheat flour.
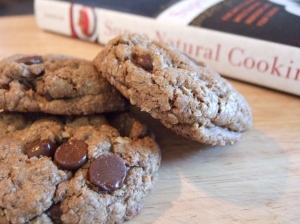
Mesquite Chocolate Chip Cookies
adapted from Heidi Swanson’s Super Natural Cooking, Celestial Arts, 2007
2 1/2 Cups whole-wheat pastry flour
1 cup mesquite flour, sifted if lumpy
1 teaspoon baking soda
1 teaspoon aluminum-free baking powder
3/4 teaspoon fine-grain sea salt
1 cup unsalted butter, softened (I used 3/4 cup coconut oil)
2 cups natural cane sugar (I used the same amount of white sugar)
3 large eggs (organic, from my local farmer’s market)
1 Tablespoon pure vanilla extract
2 cups rolled oats
2 cups semisweet chocolate chips
Preheat the oven to 375 degrees F. Position the racks in the upper half of the oven, and line 2 baking sheets with parchment paper (or silicone baking mats).
Whisk together the flours, baking soda, baking powder, and salt in a bowl. Set aside. (I like to do this is a large measuring cup or one of those “batter bowls.” This way you have a spout and it makes it a lot easier to pour the flour into the mixer.
In a large bowl or stand mixer (I used my kitchen aid), beat the butter until light and fluffy, then beat in the sugar until of a consistency like thick frosting. Beat in the eggs one at a time. Stir in the vanilla until evenly incorporated. Add the dry ingredients in 3 increments, stirring between each addition (I just put the mixer on low speed, and slowly add in the dry ingredients). At this point, you should have a moist, uniformly brown dough. Stir in the oats and chocolate chips by hand, mixing only until evenly distributed.

(Here, I have to say, I almost never mix in ingredients by hand. My personal conviction is that my mixer was a very expensive item, and it should darn well be able to mix up some cookie dough. So, usually, I make my mixer add in the chips or whatever comes at the end of the recipe. This dough, however, is very, very stiff. So, I pressed on with the rolled oats, and my mixer was doing a valiant job, but it was protesting, and groaning, and I finally gave in and finished the job by hand. The reality is that even if your mixer can do it, the dough is stiff enough that it really needs a human touch at this point to get the oats and chocolate evenly distributed. If there’s anything that will change my stubborn mind, it’s the thought of a cookie without chocolate chips.)
Drop 2 tablespoons of dough for each cookie onto the prepared baking sheets 2 inches apart and bake for about 10 minutes, until golden brown on both top and bottom. don’t over-bake these, if anything, underbake them. Cool on wire racks. (again, of course, Heidi is totally right – I baked these for exactly 10 minutes, and when they came out the seemed awfully gooey and not set. I gave one that had been cooling for 5 minutes or so to my husband and he immediately declared it underdone. I ignored him, and the cookies, once cooled are perfect. If they’d been cooked longer, they’d be dry.)

So, the finished product? Well, after I burned my tongue on the first cookies to come out of the oven, I have to say, they are absolutely amazing. They’re moist, nutty (with no nuts, for those of you with allergies), chewy. They almost taste like you’re eating a chocolate cookie, but not quite. And I know I’m not the only one who loves them – I found numerous other bloggers who just had to post this recipe because they loved it so much and Heidi took her version down. So, go, make these cookies, and then go buy Heidi’s book. It’s amazing, and every recipe is as interesting and tasty as this one!


